This is a complete howto to use LEDE/OpenWRT on
ARV7519RW22
Pre-requirements:
* Pay attention to details. Don't rush up in copying/pasting + some steps are case sensitive !
* UART-to-TTL usb cable.
* Basic soldering skills (you need to do it once)
* GNU/Linux machine (I use Arch Linux) and basic skills using it.
* Usb memory stick formatted with FAT16/FAT32
* Install these packages:
tftp-hpa : tftp server
picocom : terminal emulation program
lrzsz : xmodem, ymodem and zmodem file transfer protocols
to install them in Arch:
pacman -Sy tftp-hpa picocom lrzsz
First of all, many thanks to the
first OpenWRT/LEDE explorers who have dealt with this router.
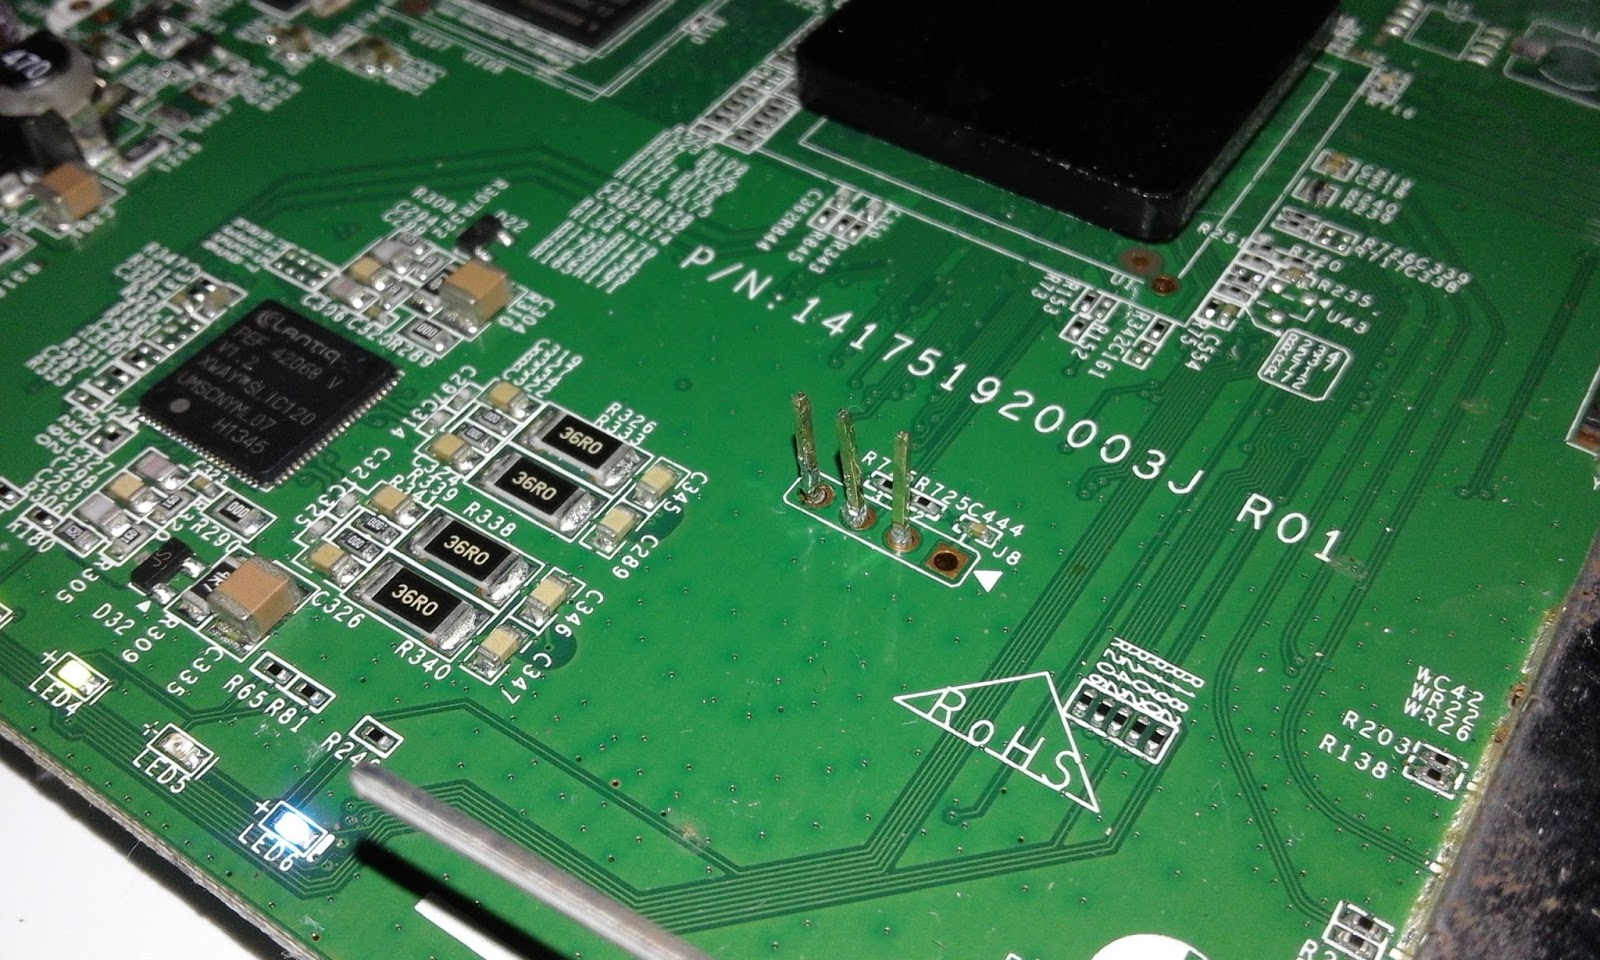
You need to solder these pins
Most UART cables come with four connector. Don't connect the one named VCC or 5v.
Only connect GND, RX and TX !!
If not sure, use a multimeter to identify the 5v/VCC connector in your UART cable.
Download these:
uboot.bin - this is the bootloader
lede-arv7519rw22.bin - this is the LEDE (OpenWRT) firmware built May, 27 2016.
lede-arv7519rw22.bin - this is the LEDE (OpenWRT) firmware built June, 20 2016 (rev 750)
lede-arv7519rw22.bin - this is the LEDE (OpenWRT) firmware built July, 03 2016 (rev 865)
After you have soldered those pins, installed required packages and connected the UART usb cable to your Linux machine, open Terminal and issue this command.
I - Making backup of the original firmware
picocom -b 115200 /dev/ttyUSB0
Note: if it tells you you don't have permissions to access /dev/ttyUSB0 then use sudo or associate your user account with the group uucp.
1. Copy this password (ctrl+c or ctrl+shift+c):
Oh!123Go
2. As soon as you power up the router quickly hit space bar 3 times
3. When asked for the key/password paste the previously copied password (ctrl+v or ctrl+shift+v)
4. Press
!
5. Press
j and wait till it finishes booting up
6. Connect a Fat16/32 formatted usb memory stick and wait a few seconds till it gets detected and mounted automatically
7. Type in these instructions one by one followed by enter
cat /dev/mtd0 > /tmp/usb/a1/mtd0.bin
sync
cat /dev/mtd1 > /tmp/usb/a1/mtd1.bin
sync
cat /dev/mtd2 > /tmp/usb/a1/mtd2.bin
sync
cat /dev/mtd3 > /tmp/usb/a1/mtd3.bin
sync
cat /dev/mtd4 > /tmp/usb/a1/mtd4.bin
sync
cat /dev/mtd5 > /tmp/usb/a1/mtd5.bin
sync
cat /dev/mtd6 > /tmp/usb/a1/mtd6.bin
sync
cat /dev/mtd7 > /tmp/usb/a1/mtd7.bin
sync
cat /dev/mtd8 > /tmp/usb/a1/mtd8.bin
sync
cat /dev/mtd9 > /tmp/usb/a1/mtd9.bin
sync
cat /dev/mtd0 > /tmp/usb/a1/mtd0a.bin
sync
cat /dev/mtd1 > /tmp/usb/a1/mtd1a.bin
sync
cat /dev/mtd2 > /tmp/usb/a1/mtd2a.bin
sync
cat /dev/mtd3 > /tmp/usb/a1/mtd3a.bin
sync
cat /dev/mtd4 > /tmp/usb/a1/mtd4a.bin
sync
cat /dev/mtd5 > /tmp/usb/a1/mtd5a.bin
sync
cat /dev/mtd6 > /tmp/usb/a1/mtd6a.bin
sync
cat /dev/mtd7 > /tmp/usb/a1/mtd7a.bin
sync
cat /dev/mtd8 > /tmp/usb/a1/mtd8a.bin
sync
cat /dev/mtd9 > /tmp/usb/a1/mtd9a.bin
sync
8. Now check the signature of the mtd files
md5sum /tmp/usb/a1/mtd*
Every mtdX.bin must have the same signature as mtdXa.bin . Ex: mtd0.bin == mtd0a.bin
if not redo the operation of backing up the original firmware.
9. Unmount and remove the usb afterwards
umount /tmp/usb/a1
Later, you can generate a full dump from those mtd files in case you want to restore the original firmware.
To do that copy them in a folder on your machine, open Terminal from that folder and run this:
cat mtd0.bin mtd1.bin mtd2.bin mtd3.bin mtd4.bin mtd5.bin mtd6.bin mtd7.bin mtd8.bin mtd9.bin > dump.bin
10. Power down you router and press ctrl+a followed by ctrl+q to quit picocom
II - Replacing the bootloader with U-Boot
! Pay attention to case sensitivity !
1. On your Linux machine, put the uboot.bin file in a folder and start Terminal from that folder.
2. run picocom with Xmodem support like this:
picocom -b 115200 /dev/ttyUSB0 --send-cmd "sx -vv"
3. Copy this password (ctrl+c or ctrl+shift+c): Oh!123Go
as soon as you power up the router quickly hit space bar 3 times
4. When asked for the key/password paste the previously copied password (ctrl+v or ctrl+shift+v)
5. Press !
6. Press U
That's a capital u
7. Press 0
That's a zero
8. Press Y
That's a capital y
9. Then press ctrl+a followed by ctrl+s and write down uboot.bin as filename and hit enter to start sending it
The process will take 2 to 3 mins to complete. Don't interrupt the process !
At the end of it you will get something like this
Xmodem sectors/kbytes sent: 2533/316kRetry 0: NAK on sector
Retry 0: NAK on sector
Retry 0: No ACK on EOT
Transfer incomplete
*** exit status: 128 ***
erase from location B0020000 done
erase from location B0040000 done
Starting to write flash ...write length 0x0004F300
0123456789abcdefghij
Start checking: flash area 0 length 324352 ...Done.
Note: If you are not sure it went well, don't reboot or power off the router, just redo the flashing steps starting from ! as explained above.
10. Now that you probably have flashed the new u-boot, power off then power on your router.
You should get something like:
U-Boot 2014.01-openwrt1 (May 16 2014 - 00:08:52) arv7519rw
Board: Lantiq ARV7519RW VRX200 Family Board
SoC: Lantiq VRX288 v1.2
CPU: 500 MHz
IO: 250 MHz
BUS: 250 MHz
BOOT: NOR
DRAM: 128 MiB
Flash: 32 MiB
*** Warning - bad CRC, using default environment
In: serial
Out: serial
Err: serial
Net: ltq-eth
Hit any key to stop autoboot: 0
Wrong Image Format for bootm command
ERROR: can't get kernel image!
11. Type in this command
printenv
You should get something like this:
addconsole=setenv bootargs $bootargs console=$consoledev,$baudrate
addeth=setenv bootargs $bootargs ethaddr=$ethaddr
addip=setenv bootargs $bootargs ip=$ipaddr:$serverip::::$netdev:off
addmachtype=setenv bootargs $bootargs machtype=arv7519rw
baudrate=115200
bootcmd=bootm ${kernel_addr}
bootdelay=2
consoledev=ttyLTQ1
ethact=ltq-eth
ethaddr=00:01:02:03:04:05
ipaddr=192.168.1.1
load-uboot-nor=tftpboot u-boot.bin
load-uboot-norspl=tftpboot u-boot.ltq.norspl
load-uboot-norspl-lzma=tftpboot u-boot.ltq.lzma.norspl
load-uboot-norspl-lzo=tftpboot u-boot.ltq.lzo.norspl
loadaddr=0x81000000
netdev=eth0
serverip=192.168.1.2
stderr=serial
stdin=serial
stdout=serial
update-uboot-nor=run load-uboot-norspl-lzo write-uboot-nor
write-uboot-nor=protect off 0xB0000000 +$filesize && erase 0xB0000000 +$filesize && cp.b $fileaddr 0xB0000000 $filesize
Environment size: 886/8188 bytes
Keep this picocom terminal open for now and carry on with the below steps.
III - Flashing LEDE firmware
1. Copy lede-arv7519rw22.bin to your tftp server folder:
on Arch:
sudo cp -iv lede-arv7519rw22.bin /srv/tftp/
sudo chmod 644 /srv/tftp/lede-arv7519rw22.bin
ls -l /srv/tftp/
2. Start/restart the tftp server
on Arch or any systemd Linux distro:
sudo systemctl restart tftpd.socket
3. (a boring part)
Connect an ethernet cable between your linux machine and your arv7519rw22 router.
On your linux machine type in terminal:
ip link
you should get something like
1: lo: mtu 65536 qdisc noqueue state UNKNOWN mode DEFAULT group default qlen 1
link/loopback 00:00:00:00:00:00 brd 00:00:00:00:00:00
2: enp2s0: mtu 1500 qdisc fq_codel state DOWN mode DEFAULT group default qlen 1000
link/ether 00:26:18:36:e0:c3 brd ff:ff:ff:ff:ff:ff
Let's assume enp2s0 is your ethernet card. If not, adjust its name in the following commands.
Setting up a wired connection:
sudo ip link set enp2s0 down
sudo ip link set enp2s0 up
sudo ip addr flush dev enp2s0
sudo ip addr add 192.168.1.2/24 broadcast 192.168.255.255 dev enp2s0
ip addr show enp2s0
Now back to the picocom terminal, copy/paste these lines one by one. Hit enter after each line to validate.
setenv write-openwrt 'tftpboot lede-arv7519rw22.bin && protect off 0xB0080000 +$filesize && erase 0xB0080000 +$filesize && cp.b $fileaddr 0xB0080000 $filesize'
setenv kernel_addr 0xB0080000
saveenv
run write-openwrt
After a few seconds, you should get something like:
ltq_phy: addr 0, link 0, speed 10, duplex 0
ltq_phy: addr 17, link 1, speed 100, duplex 1
ltq_phy: addr 18, link 0, speed 10, duplex 0
ltq_phy: addr 19, link 0, speed 10, duplex 0
ltq_phy: addr 20, link 0, speed 10, duplex 0
Using ltq-eth device
TFTP from server 192.168.1.2; our IP address is 192.168.1.1
Filename 'lede-arv7519rw22.bin'.
Load address: 0x81000000
Loading: T #################################################################
#################################################################
#################################################################
#################################################################
#################################################################
#################################################################
#################################################################
##########
1.1 MiB/s
done
Bytes transferred = 6815748 (680004 hex)
..................................................... done
Un-Protected 53 sectors
..................................................... done
Erased 53 sectors
Copy to Flash... 10....9....8....7....6....5....4....3....2....1....done
arv7519rw #
Now power off and power on your router or type reset . You are done ;)
Your router should boot up. Wait till it finish up (it takes 190 seconds the first time, afterwards only 35/45 seconds).
Hit enter to login into LEDE console or browse 192.168.1.1 to do web based config.
IV - Restoring original firmware
What if (for whatever reason) you wanted to return to the original firmware?
As I explained above you should have copied all those mtdX.bin files to a folder and run:
cat mtd0.bin mtd1.bin mtd2.bin mtd3.bin mtd4.bin mtd5.bin mtd6.bin mtd7.bin mtd8.bin mtd9.bin > dump.bin
Now that you have that dump.bin
Copy it to the TFTP server folder:
sudo cp -iv dump.bin /srv/tftp/
sudo chmod 644 /srv/tftp/dump.bin
ls -l /srv/tftp/
Set up your wired connection as explained above:
ip link
sudo ip link set enp2s0 down
sudo ip link set enp2s0 up
sudo ip addr flush dev enp2s0
sudo ip addr add 192.168.1.2/24 broadcast 192.168.255.255 dev enp2s0
ip addr show enp2s0
Connect an ethernet cable between you linux machine and the arv7519rw22 router
Connect the UART cable too.
Open a picocom terminal like:
picocom -b 115200 /dev/ttyUSB0
On it type (line by line followed by enter)
tftpboot dump.bin
run write-uboot-nor
reset
That's all !