!! This article was written years ago and probably irrelevant today !!
Sometimes sharing files and folder between Windows and GNU/Linux can be annoying and problematic especially for beginners.
In this article we're going to see how to setup Samba and how to get both Windows and GNU/Linux sharing and browsing public share the right way.
We have two scenarios :
1. GNU/Linux browsing Windows shares.
2. Windows browsing Samba shares.
Let's start with first one.
1. GNU/Linux browsing Windows shares.
First of all, we need to do some tweaking on Windows to allow easy browsing.
Step 1:
Make sure your Windows machine has a name and belongs to a workgroup like MSHOME
>Go to Control Panel, System, on "Computer Name" tab click on change Button to change the name and workgroup.
Step 2:
Make sure that Windows XP Firewall does block incoming connections.
>Go to Control Panel, Windows Firewall, on the Exceptions tab check "File and Printing Sharing"
Step 3:
Make sure Windows XP doesn't deny access to your computer from the network.
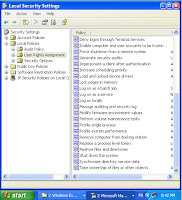
>Go to Control Panel, Administrative Tools, Local Security Policy. On the right panel browse through Security Settings-> Local Policies-> click on User Rights Assignment
Now, from that list we need to adjust two settings. The first one is "Access this computer from the network". Double click on it and make sure that at least "Everyone" group is there, if not add it.
The second setting is "Deny access to this computer from the network". Select "Guest" account in that list and remove it.
Step 4:
This one is to ensure that the guest account in Windows XP can be used by other machines on the network to authenticate for public access.
>Go to Control Panel, Administrative Tools, Computer Management. On the right panel browse through System Tools-> Local Users and Groups-> Users. Right click on Guest account, Select Properties then uncheck "Account is disabled"
Step 5: Reboot.
Now, let's create a public share on Windows. Create a folder named "Public" in C: or any other partition or drive. Right click on it, click on Properties, Select "Sharing" tab, then check "Share this folder on the network" to share the folder and check "Allow network users to change my files" if you want to give write access to network users.
That's it! You have now created a shared public folder, accessible from local network for all users.
2. Windows browsing Samba shares.
Step 1:
Make sure Samba Server is installed.
If you are using a Debian based distro like Ubuntu, select and install Samba package from Synaptic or type in terminal:
sudo apt-get install samba
Step 2:
Now, you should know that Samba config file is usually found in: /etc/samba/smb.conf
But some distro install Samba without doing any extra config and leave that task to the user. In both cases it easy to config Samba.
From Terminal, typing : (assuming you're using Ubuntu)
sudo gedit /etc/samba/smb.conf
You can replace gedit with your text editor of choice (ex: nano, kwrite, etc.)
Now, in "global" Section, try to find the following settings and change them so that they are like these:
[global]
workgroup = MSHOME
security = share
null passwords = yes
guest account = nobody
passdb backend = tdbsam
netbios name = %h
Then scroll down to the bottom and add these parameters:
[Public]
comment = Public Folder
path = /var/public
public = yes
writable = yes
only guest = no
guest ok = yes
available = yes
browsable = yes
create mask = 0666
directory mask = 0777
Save the file and go back to Terminal to finish the remaining steps.
Let's create the public folder mentioned above in "path= /var/public". In Terminal type in:
sudo mkdir /var/public
sudo chmod 777 /var/public
Now, we need to add "nobody" account to Samba users list and set its password to null (empty).
sudo smbpasswd -a nobody
sudo smbpasswd -n nobody
That's it! For this to take effect either reboot or if you are using Ubuntu type in Terminal:
sudo /etc/init.d/samba restart
Some Notes:
Note #1:
Due to a bug in Gnome 2.22, whenever you try to access a shared folder in the network you are presented with a dialog box to enter the username and password. If that's the case either ignore that box or type in "guest" as the username and leave the password empty.
Note #2:
Just as mentioned in my comment down this post, you may need to give permissions to access folders placed in /var/public belonging to/owned by your user account.
Anyway, If your Windows client starts saying that the share is not accessible, you will need to do a:
sudo chmod -R 777 /var/public/
or (if you don't want executable attribute given to everything)
sudo chmod -R 766 /var/public/
sudo find /var/public/ -type d -exec chmod 777 {} \;
Note #3:
Some Distros deny incoming connections to your GNU/Linux box through /etc/hosts.deny
If that's the case make sure that the file /etc/hosts.allow allows incoming connections.
sudo nano /etc/hosts.allow
Then add this line into it.
ALL: ALL
Note #4:
The recently released Samba 3.2 has some nice new feature such as enhanced compatibility with Windows Server 2008/2003, Vista and Active Directory.
Note #5:
For Vista users you may need to add this parameters to Global Section in smb.conf
map acl inherit = yes
Also, in Windows Vista click on Run.. and type in: secpol.msc
Go to "Local Policies"-> "Security Options" then navigate to the policy:
"Network Security: LAN Manager authentication level" and double click on it.
Change its value from "NTVLM2 responses only" to "LM and NTLM – use NTLMV2 session security if negotiated."
Note #6:
If your Windows machine is a Windows Server 2003 instead of XP, then you should disable signing/encryption which get activated automatically when you setup a Domain Controller.
Go to Control Panel, Administrative Tools, Domain Controller Security Policy.
Browse through "Local Policies"-> "Security Options", then set both:
"Microsoft network server: Digitally sign communications (always)" and
"Domain member: Digitally encrypt secure channel data (when possible)" to Disabled.